Answers to Frequently Asked Questions
How to add a domain to the hosting?
Add a domain to the hosting is not at all difficult. To add a new domain name, go to the Domain Names menu in the ISPmanager control panel.
Click the Create button and fill in the required fields in the menu that appears:
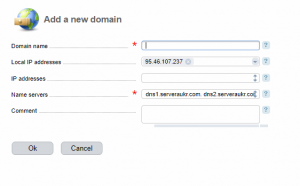
Domain name – enter the domain name with the corresponding zone that you want to add to the hosting.
IP-address – automatically assigned the IP-address of the server where your hosting account is located. If you change this address, your domain will not be associated with the site on the hosting.
Name servers – by default, our NS servers are specified, to which the domain will be parked automatically after creation (updating of records on our NS can take up to 10 minutes).
Why do I need a hosting control panel
To facilitate the maintenance of your sites on the hosting server our company provides you with special control panels.
The hosting control panel is a convenient, intuitive interface, like any computer program. It allows you to manage services in real time without a correspondence with the service of those. support. Using the hosting control panel, you can perform various actions.
- Management of sites. You can restrict access to the site directories with a password. Manage SSL certificates. Edit error pages. Also you will be available a set of scripts to create a forum, a site or a photo gallery.
- Managing the mail. You can create and delete mailboxes, configure the forwarding. You will be able to support mail filters, manage answering machines, set up mailing lists (maillists), support spam filtering.
- Domain management. You can create and modify DNS records, create new subdomains, assign redirects (redirect one URL to another), and configure site aliases.
You will also be able to support database servers. You can manage backups, configure Firewall, and view statistics on traffic and visitors to your site.
The most convenient and most commonly used hosting control panels are:
- ISPmanager;
- cPanel/WHM.
How to create a database in ISPmanager
You can create a database in IPSmanager directly from the control panel.
To create a new database, select the database tab and click on the “Create” button. On the page that opens, fill in all the required information:
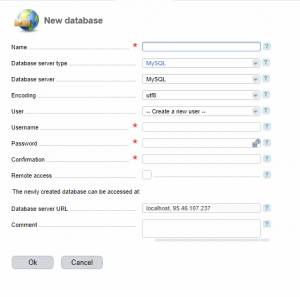
Database name – you can specify any name that is convenient for you.
Encoding – You can leave default (the default setting), if you need a specific encoding, you can select in this field.
Next, you need to create a new user by entering a name and password, or select an existing one.
Remote access – check the box if you want to access the database not from the ISPmanager panel, but directly through the Internet.
IMPORTANT: Hosting implies that many customers’ sites are hosted on the same server, including databases. Error “Database name already exists” means that a database with a similar name is already created by another hosting client. Think of a different name.
How to create a database user in ISPmanager
To create a new user, you need to select the required database and click on the “Users” button. On the opened page, click create:
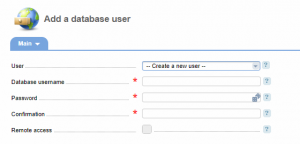
User – You can select an existing user to edit rights, or create a new one.
Username – specify the name of the new user. The name can contain letters of the Latin alphabet, numbers and a “_” sign.
Password / Confirmation – Enter the desired password for the user and repeat it to confirm.
Remote access – check the box to allow this user to access their databases from other servers or workstations.
ISPmanager password: how to change?
If you forgot the password in ISPmanager and you need to change it, you can do it, following the specified recommendations.
In the “Tools” tab, select “Databases” and you will see all your databases. Then select the database (in which you need to change the password) and in the upper right corner click the “Users” button. Then select the user for whom you want to change the password, and click the “Edit” button in the upper right corner. Then enter the password in the following fields: “Password”, “Confirmation”.
My site is not secure! What to do?
In the “Tools” tab, select “Databases” and you will see all your databases. Then select the database (in which you need to change the password) and in the upper right corner click the “Users” button. Then select the user for whom you want to change the password, and click the “Edit” button in the upper right corner. Then enter the password in the following fields: “Password”, “Confirmation”….
If you want your site to work over HTTPS, follow these steps:
1. Ensure that your account has an SSL certificate. You can purchase it from our website (Section Home – SSL) or purchase a certificate elsewhere. After activating the certificate, you can install it from the control panel> SSL.
2. After the certificate is installed, you can access your site through the HTTPS protocol.
3. If you receive a “site is not completely protected” error, it means that the resources of your site are not downloaded via the HTTPS protocol. This problem can be solved by changing the code of your website manually or using the built-in software on applications such as WordPress.
How do I upload a site for hosting?
You can upload files of your site using File manager in Control panel or FTP catalog (eg FileZilla). Data for connecting via FTP can be found in Control Panel – FTP Access. All site files must be uploaded to the public_html folder. Also in the public_html folder there should be an index.html or index.php file to make your site work correctly.
Why do I need a DNS server?
Question: Why do I need a DNS server?
Answer: To address Internet hosts, special digital combinations are used – IP addresses. DNS (Domain Name Service) is used to perform conversions between alphanumeric and numeric addresses. Usually the IP address can be written using four numbers in the decimal system, for example: 192.168.16.34 or 87.46.253.167. DNS allows you to map the IP address and domain name, for example: 77.88.21.8 = yandex.ru.
For the proper functioning of domains, you need DNS servers that answer the Internet for queries about your domain (zone). To increase the reliability of the DNS server, there should be at least two servers. The server on which the complete initial information about the domain zone is stored is called the primary DNS server, or Primary DNS. All other servers where information about this zone is located are called secondary, or Secondary DNS.
Information about the domain or as it is called – the zone file, contains several records of different types.
The most important types of DNS records are:
- – And the record (address record) connects the IP address to the host name where the site is located;
- – NS record (name server record) points to the DNS server where records are located about this domain;
- – CNAME record (canonical name record) is used to redirect requests from one domain to another;
- – MX record (mail exchange record) indicates the servers of e-mail exchange for this domain;
- – The SOA record (Start of Authority record) indicates which of the DNS servers is primary, the record also contains the contact information of the person responsible for the zone, the timings for the interaction of the DNS servers and the caching of the zone information;
- – SRV record (server selection record) indicates the server addresses for various services, usually used for Jabber and Active.
How to choose the right domain
Before choosing a domain, be sure to read our recommendations, and then you will not have any difficulties.
- The domain name must be short and memorable. The shorter the domain, the easier it is to type in the address bar of the browser. Quite often the abbreviation or abbreviation will be a more suitable domain name than the full name. But unfortunately, practically all two- and three-letter domains are already occupied. At the same time, you should not get carried away with abbreviations, so that you can not just get a set of symbols. Domain name must carry a meaning, then it will be easier to remember.
- Domain name should be easy to read and pronounce. Use for the domain name well-known and easily readable words. Try to avoid ambiguous writing one word. For example, the letter “x” in Latin can be written as “h” or “kh”. If there is a possibility of different spelling of one domain, register several options. This will save you from having to specify exactly how to write the domain.
- The domain must match the subject matter of the site. Try to tie the domain name to the subject of the site, so, by name, you can guess the content of the site. For example, sport.ua – site about sports in Ukraine, muzicportal.ru – site of musical orientation, microsoft.com – site of corporation Microsoft.
- Corresponding domain zone. Choose domain zones, based on the target audience and geographic coverage of your site. If your activity is directed to the Ukrainian market, it is logical for the top-level domain to be .ua. If you are interested in a certain city, for example, Kiev, you should choose the domain .kiev.ua. .com or .net domains are suitable for international projects. Also worth paying attention to the domains associated with your thematic focus, for example, DJs, musicians, TV men are suitable domains dj, fm, cd, tv.
- Uniqueness. Try to come up with a unique name, not like the others, and especially on the domains of your competitors. For example, okno.com.ua and okna.com.ua to mix up very easily. To whom in the end this will be profitable is still unknown. Moreover, owners of a domain registered earlier can file a claim or even sue the owner of a similar domain.
If you want to know information about an already registered domain or to check if the domain you are working on is not occupied, you should use the WHOIS service. With the help of WHOIS you can find out the name of the site administrator, postal address, e-mail (e-mail address), registration date and the end date for registration of the domain name.
For detailed information and prices for domains, please visit the Register Domains page.
Control Panel
How to transfer my site to your hosting?
Web site
If your site does not use MySQL databases, moving your site is very easy. Just upload all the files to the “public_html” folder on our server. If you have a website based on PHP, check if there are any configuration files in it, in which you can specify a domain name or path to files. If necessary, update these values. If your site uses MySQL databases, you need to transfer the database here and update the configuration files of your scripts accordingly:
1. Backup database on the old server. If your current provider has a backup MySQL tool – use it. Usually you can enter phpMyAdmin, select your database and go to the “Export” tab. Select “Save as file” and select “gzipped”. After that, the backup of your database will start.
2. Create a database on our server. Before you can restore a backup copy of the database, you will need to create a database in our system. Log into the control panel of your website and click on the MySQL database. You can create a new database and the user is there. Write MySQL data, as you will need it later.
3. Import database data to our server. Once the database is created, enter our phpMyAdmin (the icon for the tool is in the control panel). Once inside, go to the “Import” tab, go to the backup file of your database (for example, yourdatabase.sql.gz) and click “Go”. The procedure for restoring the database will begin. Be patient, because with a large backup size it can take quite a while.
4. Updating configuration files. Now that the database is restored, you will need to open the configuration file (for example, WordPress will have the wp-config.php file) of your PHP script and update the database host, database name, database user name and database password values. Use the values you recorded when creating a new database. Note: we do not use “localhost” as the host name of MySQL, our MySQL host is “mysql.hostinger.com.ua or mysql.hostinger.ru”